Peeking into Android traffic: SSL Proxying and System Certificates
As you continue on your Android debugging journey, you encounter a curious issue. There seems to be a problem with the data your app is sending to its server. So, you pull up your favorite proxy tool to take a closer look at the traffic. Before you know it, you’ve identified the problem and a fix is already brewing in your mind. But then, an interesting thought pops up: “What if I tried to check out other apps’ traffic?”.
With a spark of adventure, you open another app and switch on SSL Proxying to decode the encrypted traffic. However, the only response you’re met with is a discouraging Client SSL Handshake Failed message (or similar). A bit disappointed, you head back to your original task - fixing your own app. Yet, this peculiar question continues to bug you: why can you only see your own app’s traffic, and is there a way to peek into other apps’ traffic?
Let’s find it out together!
I’ll be using Proxyman in this article, but you should be able to achieve the same result with any Proxy you like.
SSL Proxying
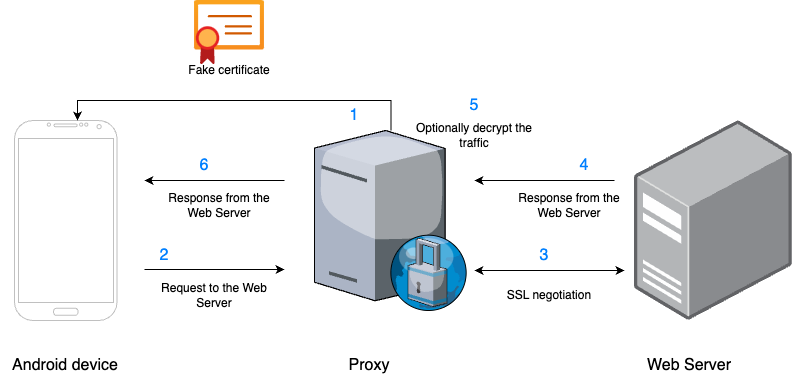
Before we move any further, let’s pause for a moment and shed some light on how SSL Proxying works.
When you set up a proxy on your Android device, the proxy tool acts as a “man in the middle”, between your device and the web server. Essentially, all traffic from your device first lands in the Proxy, which then forwards it to the web server.
SSL Proxying follows a similar process, with an added layer of security. It not only manages the communication but also handles SSL negotiations, ensuring secure connections between your device and the web server.
The proxy’s ability to intercept traffic is interesting, but to decrypt HTTPS, another crucial step needs to occur.
Remember when setting up the Proxy, you had to install a certificate on your device:
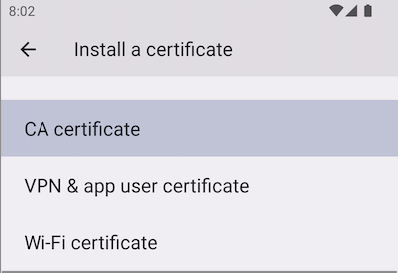
That’s the magic trick. SSL proxy tools generate a fake certificate that we install on our device. Without this certificate installed, your app would perceive the Proxy as a threat attempting to intercept the traffic. However, with the certificate in place,the Proxy is considered a trusted entity. This allows you to not just intercept, but also view the decrypted traffic.
Now that we’ve explained how the proxy and the certificate work together, you might be thinking: “Wait a minute, if all it takes to decrypt the traffic is a certificate, why does it only work for my app?”
Well, this brings us to the next part of our Android journey - the world of certificate stores.
Certificate stores & Network security configuration
Starting with Android Nougat there are two certificate stores - System and User.
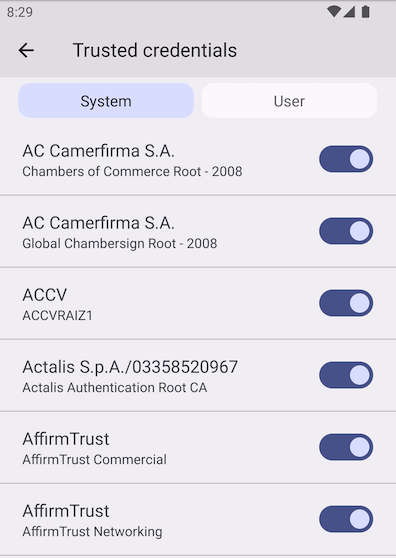
While setting Proxy you installed what’s called User certificate.
But here’s the catch: Android is pretty smart. By default, all apps trust only System certificates. That’s why you aren’t able to decrypt traffic from other apps.
Although Android defaults to System certificates, this setting can be modified through the Network security configuration. We won’t get into too many details about this, but let’s quickly go over the three options that are important for this article:
- Trusting User certificates: This means that an app can be set up to trust both System and User certificates. With this configuration, you can decrypt traffic using either type of certificate. However, most apps usually allow User certificates in debug mode only.
- Trusting System certificates: This is the default setting used by most apps in release mode. Under this configuration, only System certificates can decrypt the traffic. In the upcoming steps, we’ll try to install a System certificate and use it to decrypt traffic.
- Certificate pinning: This is the most secure and also the most complex option. Here, the app only trusts specific certificates issued by its own servers. To achieve this, the web server needs to generate a certificate, the hash of which is then added to the mobile app as a trusted entity. Even if you manage to install a System certificate, decrypting the traffic in this setup still won’t be possible.
With all this knowledge in place, let’s get our hands dirty and try to install a System certificate and decrypt some traffic.

Installing system CA Certificate
To install a system certificate you’ll need a rooted device, which is why I recomend using an Emulator.
System certificate store is located at /system/etc/security/cacerts/ within the Android file system. Unfortunately, by default /system directory is read-only and starting from Android 10 it seems to be impossible to make it read-write. Luckily Stackoverflow comes to the rescue with a workaround for it.
CA Certificates in Android are stored by the name of their hash, followed by a 0 as extension (for example 593f559a.0). We’ll have to figure this hash out; otherwise Androide will ignore our certificate. We can either install the certificate as a User and let the system generate the hash and file for us, or we can do it ourselves. I’ll walk you through both methods so you can choose the one that works best for you. Most of the steps are identical for both methods, and I’ll point out where they differ:
- Create an Android emulator without PlayStore.
- Open your favourite terminal.
- Run
emulator -list-avdsto get the name of the emulator. - If this command fails you might need to add emulator to your
PATH. On macOS you can usually find the emulator under/Users/<your_user_name>/Library/Android/sdk/emulator. - Start the desired AVD with the following command:
emulator -avd <avd_name> -writable-system. - Note: Note: If you want to use the installed certificate, you always need to start the emulator with the -writable-system option.
- Start Proxyman.
- In Proxyman you should see your host ip in the format of 192.168.1.***:9090.
- Set the proxy in your device by calling
adb shell settings put global http_proxy <host_ip:9090>. - Or simply call
adb setProxyif you read my Streamlining Android proxy setup with a custom bash function article. - In the Emulator open browser and go to
proxy.man/ssl. - The certificate should download. You might see a “The certificate is not installed” Toast, but that’s fine.
Now, depending on the method you’ve chosen:
Copy-paste way:
- In the Emulator go to settings.
- Search for CA certificate settings and open it.
- Select Install Anyway.
- Click on
proxyman-ca.pem-crtthat you just downloaded and install it. - You should see “CA certificate installed” Toast.
- Go back to terminal and run
adb shell ls /data/misc/user/0/cacerts-added/you should see your certificate installed. - Pull the file to your machine by running
adb pull /data/misc/user/0.cacerts-added/<your_cert_hash.0> /Users/<your_user_profile/system-cert-demo/, or choose other location that suits you best.
Creating hash on our own way:
- Pull the downloaded certificate to your machine by running
adb pull storage/emulated/0/Download/proxyman-ca.pem.crt /Users/<your_user_profile>/system-cert-demo/, or choose other location that suits you best. - Generate the hash by running
hashed_name=openssl x509 -inform PEM -subject_hash_old -in proxyman-ca.pem.crt | head -1. - Generate hash file by running
cp proxyman-ca.pem.crt $hashed_name.0.
Finally, regardless of the method you chose, follow these steps:
- Restart adb as root by running
adb root. - Disable secure boot verification
adb shell avbctl disable-verification. - Perform remount to make
/systemwritable withadb remount. - If this doesn’t work try running
adb remountbefore. - Push hashed certificate (
$hashed_name.0) to system certs by runningadb push /Users/<your_user_profile>/system-cert-demo/<hashed_name.0> /system/etc/security/cacerts. - You can ensure that your certificate was pushed correctly by running
adb shell ls /system/etc/security/cacerts | grep <hashed_name.0>. - Set certificate permissions:
adb shell chmod 664 /system/etc/security/cacerts/<hashed_name.0>. - Reboot device:
adb reboot.
Congratulations! The certificate is now installed as a System certificate. You can now decrypt traffic for apps that trust only system certificates.
If you want to protect your app against it, consider implementing certificate pinning that we mentioned earlier. However, setting it up is a topic for another article.
Happy coding! :)